Build a Flask App on Windows and Deploy Flask App on Any Platform
As every Flask video tutorial on the internet teach you how to install, build, and deploy flask apps on Linux and there are like no tutorials about Flask on Windows. I tried several online courses also to learn Flask but my main bottleneck was that I needed to deploy a Flask app on Windows. So I searched everywhere how to build a web app using the Flask framework on Windows and finally found a solution. Here I'm going to summarize what I learned and I will guide you to build a simple web app using the Flask framework. Let's start the journey by installing Flask on Windows.
Install Flask On Windows
First, you should install Python3 on your computer. It's better if you can install latest version of Anaconda. After the installation open the command prompt and type python and press "Enter" to check whether Python is installed correctly. If Python is installed correctly, then pip commands should work correctly now. Check it by typing pip -V on the command prompt and pressing "Enter".
If pip -V command shows the current pip version on your computer, we are ready to install Flask. We are going to install "Waitress" with Flask because that's the secret behind running Flask easily on Windows. Waitress is a Windows compatible server that we can use to deploy our Flask app on multiple threads. Let's enter the following command on the command prompt. Better if you run the command prompt as the administrator.
pip install flask waitress
Build Your First Flask API
Building a web API with Flask is very easy. The below code shows a testing API endpoint developed using Flask. Just type the below code and save it as "test.py" on your PC.
Open the command prompt again in the location you saved "test.py" file. Now you can check whether Flask works correctly on your computer by running the "test.py" program by typing the below command in the command prompt.
python test.py
Open the browser and go to "127.0.0.1:8080/api/test" URL to check whether it's working.
Handling Request Parameters in Flask
Let's go a few steps ahead and try to handle parameters inside the API requests. We need to import "request" library to handle request params. Read the below code and run it. It's not hard to understand what the below code does.
Now run the above code and open your web browser and go to "127.0.0.1:8080/hello" URL. Then it will show you the text "Hello world" because the "name" variable is equal to the default value "world". Just change the URL like "127.0.0.1:8080/hello/?name=Ravindu". Now you can see the text "Hello Ravindu" because we have passed "Ravindu" as a request parameter (request argument).
Important: If you change your code, you should rerun the file from the command prompt to see changes.
Best Folder Structure for A Simple Flask App
The below image shows the folder structure, I use when I develop very simple Flask applications.
All the HTML files should save in the "templates" folder because it's a pre-defined rule in Flask. Other resources can put in the "resources" folder and you can create subfolders in it to make it more manageable.
HTML Templates with Flask API
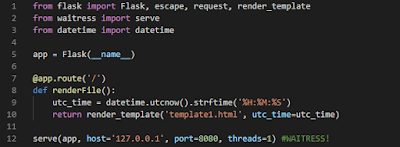
Let's try to render an HTML file inside the templates folder when a user hits an API endpoint. Here I'm going to use another python library called "datetime" to display the current UTC time in the HTML file because that also will be a useful experience for you.
This code is also not hard to understand. Here I have assigned the current UTC time to a variable called "utc_time" and I have returned a rendered template from the function. When I render the HTML template, I passed the "utc_time" variable as a parameter. You can see how I used that parameter in the "template1.html" file from the below code.
If it's not working, just double check whether you correctly followed the folder structure I mentioned above. If you have any other problem, don't hesitate to comment below and ask. Thank you for reading! Happy coding!


1 Comments
To build a Flask app on Windows, install Flask via pip install flask, create app.py, and run it using python app emailtooltester To deploy, use platforms like Heroku, Render, or PythonAnywhere by pushing your code and configuring necessary files like Procfile and requirements.txt.
ReplyDeletePost a Comment